XCode 3.2.1 on Snow Leopard plays nicely with jailbroken iPhone OS 3.1.2. You can do Buid & Go and even debug directly on the device. The procedure described for XCode 3.2 and iPhone OS 3.1 is exactly the same. However, I have been asked a couple of times to put it all together and make a step-by-step guide and this seem to be a good occasion.
First things first: a jailbroken iPhone 3.1.2
If your iPhone is still jailed, it would be probably a good idea to read through the Pwnage Tool 3.1.4 release news and maybe have a look at the jailbreaking step-by-step guide which works for me every time.
Once your iPhone is jailbroken, open Cydia go to the "Manage" tab, select "Sources" and add http://iphone.org.hk/apt/. Then install "Installd Patch" (see image). This is crucial for installing your own application on your iPhone using XCode.
Obtain a self-signing identity
Jailbroken or not iPhone needs software to be signed. If this is your first time, you need to create your own signing certificate. The whole process is described in detail in the original Apple document titled "Obtaining Signing Identity".Once you have the certificate, switch to XCode and go to Project -> Edit Project Settings, scroll to Code Signing / Code Signing Identity / Any iPhone OS Device and change the value to your freshly created identity name, probably "iPhone Developer" (see image). This step needs to be repeated for each of the existing projects. All new projects should get the value automatically.
Make XCode 3.2.1 compile for your iPhone 3.1.2
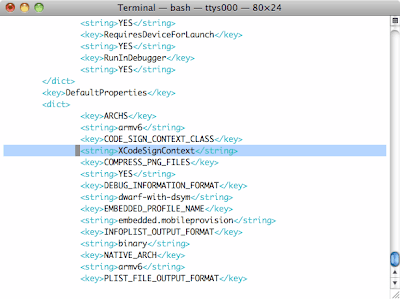
 Self-signing certificate is good enough for you, it should be so for XCode. Let's tell him. In the file:
/Developer/Platforms/iPhoneOS.platform/Info.plist
find line 46 and replace "XCiPhoneOSCodeSignContext" with "XCCodeSignContext" (see image). Repeat the operation for line 79 and save the file.
If you want to stop here because you don't need debugging, just restart XCode and you should be able to use Build & Go to compile and install applications on your iPhone directly from XCode.
Make XCode 3.2.1 debug on your iPhone 3.1.2
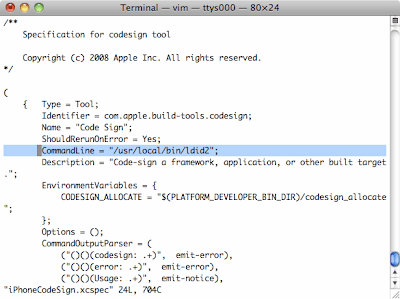
There is some small work to be done if you want to make your XCode 3.2.1 debug on your iPhone 3.1.2 for you. First of all you need to have ldid and ldid2. ldid is a replacement for codesign, which adds entitlements necessary for debugging. We have lost the feature in previous part and now it is time to get around. ldid2 is a shell script which makes use of ldid.After you have downloaded the archive, unpack the files and put them into /usr/local/bin directory. Then make sure they are both executable.
 The last step would be to tell XCode it needs to use ldid2 instead of codesign. In the file: /Developer/Platforms/iPhoneOS.platform/Developer/Library/Xcode/Plug-ins/iPhoneOS Build System Support.xcplugin/Contents/Resources/iPhoneCodeSign.xcspec find line 12 and replace "/usr/bin/codesign" with "/usr/local/bin/ldid2" (see image).
Now restart XCode and you should be able to do Build & Go and debug directly on your iPhone.
Update (26/10/2009)
Well, almost. Just one tiny thing remaining. For every project you want to debug, you need to add -gta flag to "Other Code Signing Flags" in the project settings.
I hope you found this guide useful, it worked for you and made you a bit happier. Please don't think twice before you leave your comment.
Thanks for reading,
Jacek


